 — Desktop computer — Mode d'emploi PDF")
ESPRIMO P5700 (I915GV) - Desktop computer FUJITSU SIEMENS - Free user manual and instructions
Find the device manual for free ESPRIMO P5700 (I915GV) FUJITSU SIEMENS in PDF.

| Product type | Desktop computer |
| Brand | Fujitsu Siemens |
| Model | ESPRIMO P5700 (I915GV) |
| Processor | Intel Pentium 4 or Celeron D, socket LGA775, FSB 533/800 MHz |
| Memory | DDR2 533 SDRAM, 1.8 V, 240 pins, up to 4 GB (non-ECC, unbuffered) |
| Graphics | Intel GMA 900, 2D/3D, Dynamic Video Memory, RAMDAC 400 MHz |
| Supported resolutions | Up to 2048 x 1536 at 75 Hz (16 bits) |
| External ports | PS/2 keyboard (purple), PS/2 mouse (green), serial (turquoise), parallel (burgundy), LAN RJ-45, USB 1.1/2.0, audio |
| Storage | Not specified (likely SATA/IDE hard drive) |
| Power supply | Mains, not specified in detail |
| Maintenance and cleaning | Unplug before any intervention; avoid electrostatic discharge by touching a grounded metal object |
| Safety | Unplug the device before opening the case; do not touch component pins |
| Spare parts and repairability | Processor, memory, expansion cards replaceable; socket protective cover required for warranty |
| General information | Manual available in multiple languages; support via website or hotline |
| Compatible operating systems | Not specified (Windows likely) |
| Audio controller | AC97 or HD Audio (depending on configuration) |
| Network controller | Integrated LAN |
| BIOS | Update via DOS floppy disk or DeskFlash utility under Windows |
Frequently Asked Questions - ESPRIMO P5700 (I915GV) FUJITSU SIEMENS
User questions about ESPRIMO P5700 (I915GV) FUJITSU SIEMENS
0 question about this device. Answer the ones you know or ask your own.
Ask a new question about this device
Download the instructions for your Desktop computer in PDF format for free! Find your manual ESPRIMO P5700 (I915GV) - FUJITSU SIEMENS and take your electronic device back in hand. On this page are published all the documents necessary for the use of your device. ESPRIMO P5700 (I915GV) by FUJITSU SIEMENS.
USER MANUAL ESPRIMO P5700 (I915GV) FUJITSU SIEMENS
Are there any technical problems or other questions you need clarified?
Please contact:
The latest information and updates (e.g. BIOS update) on our mainboards can be found on the Internet under: www.fujitsu-siemens.com/mainboards
Intel, Pentium and Celeron are registered trademarks of Intel Corporation, USA.
Microsoft, MS, MS-DOS and Windows are registered trademarks of Microsoft Corporation.
PS/2 and OS/2 Warp are registered trademarks of International Business Machines, Inc.
All other trademarks referenced are trademarks or registered trademarks of their respective owners, whose protected rights are acknowledged.
All rights, including rights of translation, reproduction by printing, copying or similar methods, even of parts are reserved.
Offenders will be liable for damages.
All rights, including rights created by patent grant or registration of a utility model or design, are reserved. Delivery subject to availability.
Right of technical modification reserved.
This manual has been printed on recycled paper.
Printed in the Federal Republic of Germany
AG 10/05
Ausgabe/Edition 1
List of onboard features
| Chipset | Intel® 915GV |
| Board size | μATX |
| VGA | ✓ |
| Audio / 8-channel / S/PDIF 5.1 | ✓ / - / - |
| Buzzer / int. Speaker Support | - / ✓ |
| LAN 1 Gbit / 100 Mbit / 10 Mbit | ✓ / ✓ / ✓ |
| LAN ASF / AoL / WoL / Boot | - / - / ✓ / ✓ |
| Serial ATA / ATA / RAID | ✓ / ✓ / - |
| FireWire™ / USB 2.0 | - / ✓ |
| FAN monitored PSU* / CPU / AUX1 / AUX2 | - / - / - / - |
| FAN controlled PSU* / CPU / AUX1 / AUX2 | - / ✓ / ✓ / - |
| TEMP monitored CPU / ONB1 / ONB2 / OFFB | ✓ / ✓ / - / - |
| SmartCard SystemLock (USB / serial) | - / - |
| Fujitsu Siemens Computers Keyboard Power Button Support | - |
List of special onboard features
| Silent Fan / Silent Fan LT / System Guard / Silent Drives | - / √ / √ / √ |
| Recovery BIOS / Desk Update / Multi Boot / Safe Standby | √ / √ / √ / √ |
| HDD Password | - |
| Logo Boot / Intel On Screen Branding | - / √ |
- Not supported by standard Power Supplies
| Special Features | |
| Silent Fan LT | Independent temperature related processor-fan supervision and control |
| System Guard | View and adjust Silent Fan LT |
| Silent Drives | Noise reduction for optical and hard disk drives |
| Recovery BIOS | Restores a disrupted BIOS |
| Desk Update | Simple driver update with DU CD |
| Multi Boot | Comfortable boot from any boot device |
| Safe Standby | Prevents data loss in S3 (save-to-RAM) |
Power Supply Requirements - for onboard components (worst case)
| Source | Voltage | Maximal variation | Mainboard current (Maximal) |
| Main Power Supply | + 12 V | ± 5 % | 10.0 A |
| - 12 V | ± 10 % | 0.05 A | |
| + 5 V | ± 5 % | 6 A | |
| + 3.3 V | ± 5 % | 4 A | |
| Aux. Power Supply | + 5 V | ± 5 % | 2 A |
Mainboard D2331

Audioeingang (Line in), hellblau

Information about boards
Be sure to observe the following for boards with ESD:
- You must always discharge static build up (e.g. by touching a grounded object) before working.
The equipment and tools you use must be free of static charges. - Remove the power plug from the mains supply before inserting or removing boards containing ESDs.
Always hold boards with ESDs by their edges. - Never touch pins or conductors on boards fitted with ESDs.
An overview of the features is provided in the data sheet.
Special features
Your mainboard is available in different configuration levels. Depending on the configuration, your mainboard is equipped with or supports special features.
This manual describes the most important properties of this mainboard.
Additional information on mainboards is contained in the manual "Basic information on mainboard" on the "User Documentation" or "OEM Mainboard" CDs, or on the Internet.
Interfaces and connectors
The location of the interfaces and connectors of your mainboard is specified at the beginning of the manual.
The components and connectors marked are not necessarily present on the mainboard.
External ports
The location of the external connections of your mainboard is specified at the beginning of the manual.

PS/2 keyboard port, purple

Serial interface, turquoise

PS/2 mouse port, green

Parallel port/Printer, burgundy
LAN

LAN port (RJ-45)

Microphone jack (mono), pink

Monitor port, blue

USB - Universal Serial Bus, black

Audio input (Line in), light blue

Audio output (Line out), light green
Installing/removing or replacing processor (with heat sink)

Disconnect the system from the mains voltage before performing any of the tasks described below. Details are contained in the operating manual of your system.
Technical data
Intel Pentium 4 with 533 or 800 MHz front side bus in the LGA775 design (Value FMB04A)
Intel Celeron D with 533 MHz Front Side Bus in the LGA775 design
- A current list of the processors supported by this mainboard is available on the Internet at: www.fujitsu-siemens.com/support.

Never touch the underside of the processor. Even minor soiling such as grease from the skin can impair the processor's operation or destroy the processor.
Place the processor in the socket with extreme care, as the spring contacts of the socket are very delicate and must not be bent.
If one or more spring contacts are bent do not insert the processor in any case as it may be damaged by doing so. Please contact the responsible vendor.
Remove the heat sink.

The processor socket ist covered with a protective cap to protect the spring contacts In a warranty case the mainboard can only be taken back by Fujitsu Siemens Computers with the protective cap secured!
Press down the lever and unhook it.
Fold up the frame.
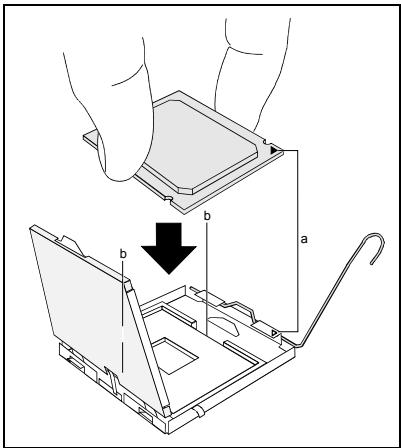
Hold the processor between your thumb and index finger and insert it into the socket (b) so that the marking of the processor is aligned with the marking on the socket (a).
Fold down the frame.
Press the lever downward until it is hooked in again.
Remove the protective cap and keep it.

Please note that, depending on the heat sink used, different heat sink mounts are required on the mainboard.
Depending on the configuration variant, you must pull a protective foil off the heat sink or coat the heat sink with heat conducting paste before fitting it.
Secure the heat sink - depending on the model - with four screws or push it into the mounts.
Installing/removing or replacing main memory
Technical data
Technology: DDR2 533 SDRAM unbuffered DIMM modules 240-Pin; 1.8 V; 64 Bit, no ECC
Size: 256 Mbytes to 4 Gbyte DDR2 533 SDRAM
Granularity: 256, 512 or 1024 Mbyte for one socket
A current list of the memory modules recommended for this mainboard is available on the Internet at: www.fujitsu-siemens.com/support.
At least one memory module must be installed. Memory modules with different memory capacities can be combined.

You may use only unbuffered 1.8V memory modules without ECC.
DDR2-DIMM-memory modules must meet the PC2-3200U or PC2-4200U specification.

If you use more than one memory module, then make sure to distribute the memory modules over both memory channels. By doing this you use the performance advantages of the dual-channel mode.
The maximum system performance is given when the same memory size is used in Channel A and Channel B.
To simplify equipping, the slots are colour coded.
With a memory configuration of 4 Gbytes the visible and usable main memory can be reduced down to 3 Gbytes (depending on the system configuration).

| Number of inserted memory modules | ||||
| slot to be used | 1 | 2 | 3 | 4 |
| Channel A, slot 1 | X | X | X | X |
| Channel A, slot 3 | X | X | ||
| Channel B, slot 2 | X | X | X | |
| Channel B, slot 4 | X | |||
The installation/removal is described in the "Basic information on mainboard" manual.
PCI bus interrupts - Selecting correct PCI slot
Extensive information on this section is contained in the manual "Basic information on mainboard".

To achieve optimum stability, performance and compatibility, avoid the multiple use of ISA IRQs or PCI IRQ Lines (IRQ sharing). Should IRQ sharing be unavoidable, then all involved devices and their drivers must support IRQ sharing.
PCI IRQ Lines connect AGP slots, PCI slots and onboard components to the interrupt controller. PCI IRQ Lines are permanently wired on the mainboard.
Which ISA IRQs are assigned to the PCI IRQ Lines is normally automatically specified by the BIOS (see "BIOS Setup" description).
Monofunctional expansions cards
Standard AGP and PCI expansion cards require a maximum of one interrupt, which is called the PCI interrupt INT A. Expansion cards that do not require an interrupt can be installed in any desired slot.
Multifunctional expansion cards or expansion cards with integrated PCI-PCI bridge
These expansion cards require up to four PCI interrupts: INT A, INT B, INT C, INT D. How many and which of these interrupts are used is specified in the documentation provided with the card.
The assignment of the PCI interrupts to the IRQ Lines is shown in the following table:
| PCI INT LINE | Controller or slot INT | |||||||||||||||
| On board controller | Mechanical slot | |||||||||||||||
| USB 1.1 | USB 2.0 | SMBus | AC97 / HD Audio | LAN | 1 | 2 | 3 | 4 | - | - | - | |||||
| AC97 | HD Audio | PCIex1 | 1 | 2 | - | - | - | - | ||||||||
| 1st | 2nd | 3rd | 4th | |||||||||||||
| 1 (A) | - | - | - | - | - | - | - | X | - | A | B | - | - | - | - | - |
| 2 (B) | - | - | - | - | - | - | X | - | - | B | C | - | - | - | - | - |
| 3 (C) | - | - | - | - | - | - | - | - | - | - | D | D | C | - | - | - |
| 4 (D) | - | - | - | - | - | X | - | - | X | - | A | C | D | - | - | - |
| 5 (E) | - | - | - | X | - | - | - | - | - | - | - | - | - | - | - | - |
| 6 (F) | - | - | X | - | - | - | - | - | - | - | - | B | A | - | - | - |
| 7 (G) | - | X | - | - | - | - | - | - | - | - | - | A | B | - | - | - |
| 8 (H) | X | - | - | - | X | - | - | - | - | - | - | - | - | - | - | - |
Use the first PCI slots that have a single PCI IRQ Line (no IRQ sharing). If you must use another PCI slot with IRQ sharing, check whether the expansion card properly supports IRQ sharing with the other devices on this PCI IRQ Line. The drivers of all cards and components on this PCI IRQ Line must also support IRQ sharing.
BIOS update
When should a BIOS update be carried out?
Fujitsu Siemens Computers makes new BIOS versions available to ensure compatibility to new operating systems, new software or new hardware. In addition, new BIOS functions can also be integrated.
A BIOS update should always also be carried out when a problem exists that cannot be solved with new drivers or new software.
Where can I obtain BIOS updates?
The BIOS updates are available on the Internet at www.fujitsu-siemens.com/support.
How does a BIOS update work?
You have two ways of doing this:
- BIOS update under DOS with bootable BIOS update floppy disk - brief description
Download the update file from out website to your PC.
Insert an empty floppy disk (1.44 Mbyte).
Run the update file (e.g. 2331103.EXE).
A bootable update floppy disk is created. Leave this floppy disk in the drive.
Restart the PC.
Follow the instructions on screen.

Detailed information on the BIOS update under DOS is provided in the manual "BIOS Setup" ("Drivers & Utilities" CD).
- BIOS update under Windows with DeskFlash utility
A BIOS update can also be carried out directly under Windows with the DeskFlash utility. DeskFlash is contained on the "Drivers & Utilities" CD (under DeskUpdate).
Graphics port
Technical data
Function: Intel GMA 900, 2D/3D graphics controller, Dynamic Video memory Technology, 400 Mhz integrated 24-bit RAMDAC
Features: Display Data Channel (DDC), 2 DVO channels (up to 165 megapixels per channel), dual-view support for ADD2 boards
Screen resolution
Depending on the operating system used, the screen resolutions in the following table refer to the mainboard screen controller.
If you are using an external screen controller, you will find details of supported screen resolutions in the operating manual or technical manual supplied with the controller.
| Screen resolution | Refresh rate (Hz) | Colour |
| 640 x 480 | 120 | 32 bit |
| 800 x 600 | 120 | 32 bit |
| 1024 x 768 | 100 | 32 bit |
| 1280 x 1024 | 100 | 32 bit |
| 1600 x 1200 | 100 | 16 bit |
| 1920 x 1440 | 75 | 16 bit |
| 2048 x 1536 | 75 | 16 bit |
Mainboard D2331

Yka3aHnI IO MoDyJIaM
Дя мodyл e n c EGB o63aTeIbHo yuHtIbAite CneIyUoIee:
Ipepa60toCMOyJMaTnTre6yeTcStaUeckn pa3pAHTb CBOe TeNo (Hapimep nocpeDCTBOM kacaHna KAKORo-JIn6 3aemHeHHoro npedMeTa).
- ICKIIOUHTb BO3MOXHOCTb CTaTNUeCKOTo 3apraIa IcNoJIb3yEmbIX yCTpOJCTB INHCTpyMeHTOB.
- Ipepe yctaHOBko INI IN CHaTneM MOyNe BbIHbTe BnIKy CteBOrO KaBeJIra n3 po3eTKI.
KacainTecbToIbKO KpOMOKMoUyne.
He npikacaiTecb K uTIOBbIM BbIBOaM IIN neaTHbIM npoBOHnKAM MOyIa.
O630p npo13B0dCTBeHHbIX poka3aTeNe Bbl naJeTe B texHnueckom nacIopTe!
OTJNUHTeJIbHbIe OCO6eHHOCTN
Bb mokeTe npno6peCTn BaUy MaTePNHcKyo INaTy B pa3IuHbIX KOHpfupaCIOHOHBIX INcOJIHeHnx. Ba7a MaTePNHcKa INaTa ObnaaTe ONpeDeIeHNbIMN POKa3aTeJIaMn IIN NOdEprKbNAeT INx B 3aBVCIMocTn OT eKoHfNpyaun.
B 3TOM PykoBoDCTBe NO 3KcPlyaTuIN Bbl NaIeTe OINcaHne BaXHeNux CBOYCTB 3TOI MaTePHCKO INaTbI.
AydnoBxoD (Line in), CBeTNo-cnHn

AynobbixoD (Line out), cBeTno-3eIeHbI
MOnTaJ/DeMOHTaX IJIH 3aMeHa IpoUeCCopoB (c paDnaTOpom)

Дя оушьпеня BCex onucaHbIX 3dceb pa6ot Ba7a cnCTema DoJxHa 6bITb ПОЛнOCtю OTKIQUeHa OT cTeBOrO HanpЯжен! Bolee noIopNoHyIO INΦopMaζIIO ob ЗTom Bы наДeTe B rykoBoDCTbe NO kCnPyatauIN BaWe cnCTembl.
Texnueckne daHbie
Intel Pentium 4 c 533 / 800 M u Front Side Bus B KOHCTpyKTHBOM INCNOJHeHIN LGA775 (Value FMB04A)
Intel Celeron D c 533 MΓç Front Side Bus B KOHCTpyKTHBOM INCNoJIHeHIM LGA775
- Aktyальный сиюсок поочеров, подерхимаьх STОМ MaTePинСКо ПпАТо, ВИНтөрөт eHa caiTe: www.fujitsu-siemens.com/support.

Hn B Koem clyuae He npKacaiTecB K HxHNe CTOpOHe npoueccopa. Yxke MaJeunne 3aqr3HeHn, Ka HApPmEep, Xnp Ha KOxE, MOryT HeraTINBHO Cka3aTbCra Ha pa6oTe npoueccopa nn Xpe pa3pyuNTb erO.
UcTaHaBnBaIte npOceccop B pa3bem OChEh OCTOpOXH, NocKoIbky npyXHHbIe KOHTaKtIb Ha pa3beme OChE h YCbCTBnTeNbHbI INx HeIb3aN3r6aTb.
B TOM clyae, ecn OdNH nH HeeKoNbKO npyKHHbIX KOHTaKTOB N3OrHyTbI, HN B KOem cnyae He yctaHaBnBaIte Ipoceccop, NockoNbKy 13-3a 3TORO OH MOxET 6bITb NOBpeXdH. PoXanyIcTa, ObpaTntecb HenocpeDCTBeHHO K KomTeHTHOMy npodabuy.
UdaIte paIaIaTOp.

Pa3bem DnI npoecoppa 3akpbIT 3aunTHO nPnactHKnO dIy 3aunTbI npyKHHbIX KOHTaTob. B cnyae ppeBraBHeNRA rapAHTnHbIX npTeH3N BO3BpaUaEMa MaTePNHcKa nIATA MOKeT 6blb npInHaTb TOIbKO npn HAnuNn npnKpEnHHO 3aunTHO nPnactHKn fnpMbI Fujitsu Siemens Computers!
Hakmnte Ha pbiur n nohImte ero.
Подимпе устpoистvo креллени вевр.

DepxnTe npoecCop 60nbMm yka3aTeIbHbIM naBcAmN BCTabbTe erO B pa3beM (b) TaK, TTObI MapKnPOBkHa npoecCope NO CBOeMy pacnoJIOKeHHIO NIOJIHOCTbIO COBnAa C mapKnPOBkOHa pa3beme (a).
OnycTe yctpoiCTBO KpeJIeHnBn3.
Hakmnte Ha pbuarg Bn3 Do ueJyka, 03haaouero, YTO npoceccop 3akpenHe.
UdaInTe 3aunTHyU PnlaCTnHky u CoXpaHnTe ee.

IopkaJyIcTa, yUHTbIbAaTe To, UTo B 3aBNCIMOCTN OT IcNoJIb3YeMOro paIaNATopa Ha MaTePnHckO IPiTe Tpe6yIoTcra pa3JIuHbIe yCTpOriCTBa KpeIIeHnra paIaNATopa.
B 3aBnCIMoCTn OT BapnaHTa KOHfNrgpaunn nepeyctaHObKO paNaTopa BbdoJHKbI cHrTB 3aunTHyo pHeKcy c paNaTopa, nnn Je nokpbItb paNaTOp TepnonpOBOJaue niactOn.
YkpeneptapeaiaopB3abncmoctnOT KOHpypaun) npn nmou qetbipex uypnoB nn JKe BCTaBte erO B KpeNek.
MoHTaK/ДeMOHTaK ИПи 3aMeHa O3Y
Texnueckne daHbie
Texhono: DDR2 533 SDRAM moDyIn DIMM 6e3 6yfepn3aun 240-Pin;1,8B;64 6nt,6e3 ECC
O6u npa3mep: 256 M6aI Ta do 4 76aI ToB DDR2 533 SDRAM
PazmepbMoyn:256,512n11024M6aTobHaKaJDomMoyn
AkyaIbHbI CNUCOK MOyJeN pAmrTn, peKOMeHNoBaHbIX dIЯ 3ToI MaTePHCKO IJIaTbI, Bbl NaIeTe B INTEpHeTe Ha caIte: www.fujitsu-siemens.com/support.
HeoXoDIMO BCTpOHTb XOTy 6bl OOnH MoDyIb NamrTn. MoKHO KOM6HnHpOBaTb MoDyIi NaMRTn c pa3nnuHoi EMKoCTbO 3Y.

ДусkaETЯпIMeHHeNeToJbkoMoDyIeNЯмТи6e3Буфepn3aun1,8В6e3ECC.
MódyNJn pAMrTi DDR2-DIMM D0JXHbI COOTBeTCTBOBaTcpeuΦnKaun PC2-3200U nJI PC2-4200U.

EcnBbI nCnOJb3yeTe 6oJbIe OndHOro MoDyIa NamrTn, CneIITe 3a TeM, YTObI MoDyIa NamrTn 6bJIIN pacnPpeJeIeHbI Ha o6oN KcHaIaNax C naMraTbIO. 3a Cuet 3TOrO Bbl 6yDeTe NcNoIb3OBAtB npEnMyIeCTBa pa6oUHX xapakTePncTnK dByXKaHaJIbHorO peKIma Dual-Channel-Mode.
MaKcImaJIbHbIe pa6OuHne xapaKTePrcNTnKIOCTTgAHOTCB TOM Clyae,ecNHa KaHaIax Channel A n Channel B NcNoJIb3yOToC MoDyIn pAmrTn C OdnHaKOBbIMn pa3MepaMn.
Port microphone, rose

Port moniteur, bleu

USB - Universal Serial Bus, noir

Entrée audio (Line in), bleu ciel

Sortie audio (Line out), vert clair